An overview of printing techniques for Vietnamese banknotes
Part 1: Early issues
Nguyễn Đức Việt, Vietnam Numismatics #3 (04-2018), p.47-56
Most people know the concept of money as a universal equivalent used to exchange goods and services, but there are many different perspectives on money known only to specialists. These include:
- Money reflects the independence and sovereignty of a people, a nation, or a territory, and the existence of a ruling regime. Most independent nations do not want to use the currency of another country.
- Money also reflects the economic or social conditions, or both, of the region where it was used at that time. During the prosperous Early Lê period, coins were cast large, thick, and beautiful, while during the chaotic period of King Quang Trung with continuous war, coins were cast thin and small. Likewise, during the resistance war against the French, in difficult conditions, war, and many shortages, paper money were printed on many different types of paper, in many similar colors rather than a standardized design, as they were printed at different locations, in different print runs, on different printing presses, and even using different water sources...
But whether in difficult times or in times of peace and reunification, money was always printed under the best possible conditions. Accompanying it was a strict management system for quantity, security, and anti-counterfeiting. And of course, banknote printing has always been carried out under absolute secrecy. Therefore, research on banknote printing is quite difficult in many respects and requires some knowledge about the printing techniques.
This is the first article in a series on banknote printing, so the author would like to present readers with some information on the history of the printing industry and the most basic knowledge of printing, which will serve as the basis for the analyses that follow. The following part of the article analyzes the banknote printing techniques of the Democratic Republic of Vietnam and the Socialist Republic of Vietnam from 1945 to the present. This research is based on printing techniques used worldwide and on the examination of specimens using a digital microscope with a magnification of up to 1,000 times. In addition, the author also consulted with many experts in the printing field.
In Part 1 of this research, the author will limit the discussion to early banknotes of the Ministry of Finance and sincerely hopes to receive feedback and constructive discussions from collectors, researchers specializing in this field, printing industry experts, and readers...
1. History of printing
1.1. Early printing methods
In AD 175, the Han emperor ordered the Confucian classics to be collected and engraved in order to preserve these invaluable works for future generations. Consequently, the Confucian classics became exceedingly scarce. Seeking to own copies of these works without sacrificing almost their entire fortunes, Confucian scholars devised the earliest replication technique: stone rubbing. By placing paper over the carved stone tablets and rubbing the surface, they produced rubbings featuring white text on a dark background.
However, it was Buddhists, not followers of Confucianism, who made the breakthrough in printing technology. It was called woodblock printing: texts and images were carved in relief on a wooden block (Figure 1), ink was then applied to the surface, and finally the block was pressed onto paper... This method later became widely used throughout East Asia. Today we still use this method when stamping seals.
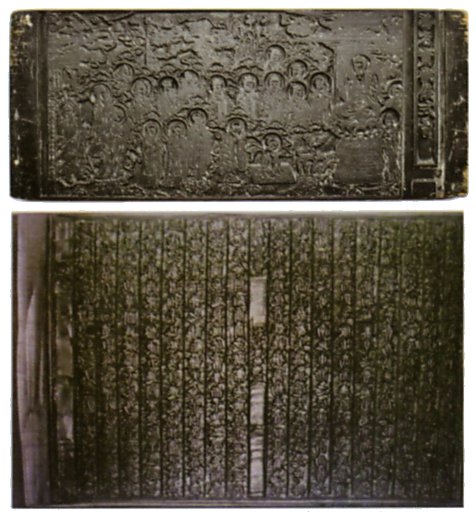
However, this method had the disadvantage of taking time to make the printing block, and after printing was finished, the printing block could not be reused. And if the craftsman made a small mistake while carving the printing block, the work would have to be started again from the beginning. To solve the above disadvantages, Bi Sheng, a printer in the Song dynasty, invented the method of printing with separate characters. First, these characters were carved in relief on a piece of clay. The clay piece was then fired and attached to a thin iron plate, creating a printing block. After completion, the printing blocks were disassembled and stored for future printing (Figure 2).
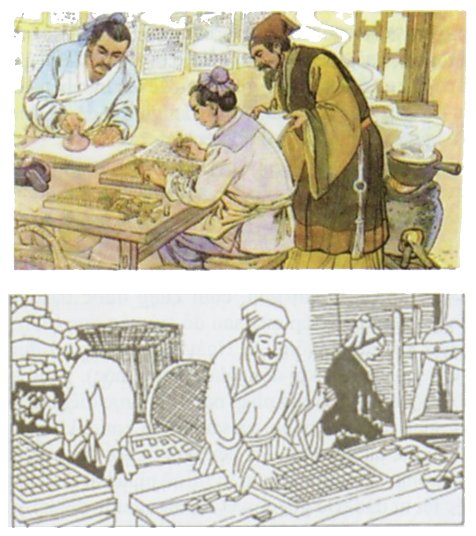
Clearly, this was a great idea, but it was extremely difficult to implement, as Chinese writing could contain thousands of separate characters. However, this technology quickly spread across Asia, and through the Silk Road to Europe.
1.2. The European Revolution
With the alphabet, movable printing technology became much simpler and easier to apply. In 1448, Johann Gutenberg became the first person to apply this method. Gutenberg used metal to create individual letters, numbers, and other separate characters, then placed them into a frame and arranged them to form a message before printing it in large quantities (Figure 3). And it became superior to what the Chinese had created: the printed works became more refined, sharper, and easier to preserve. He was also the first person to use oil-based printing ink, and this improvement made prints sharper and much more durable than earlier prints made with water-based ink.
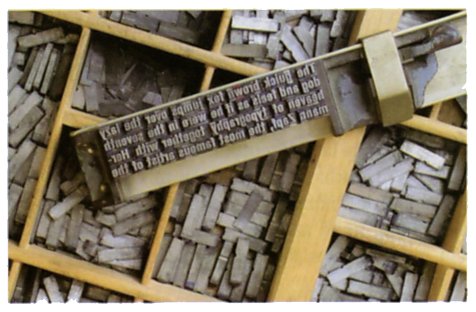
Within forty years of its invention, movable type printing quickly spread throughout Europe, resulting in more than 20 million books being printed during that time. It truly created a communication revolution, and it can be said that this invention opened a new era in European civilization: the Renaissance. Gutenberg's printing technology was considered by Life magazine to be the greatest invention of the past 1,000 years.
1.3. Further developments
Printing technology remained almost unchanged for the three centuries after Gutenberg's method was introduced. This method proved to be much more efficient than previous methods, although it still required a great deal of labor. In 1800, Lord Stanhope improved this printing method by using steel plates, which reduced manual labor; however, it still did not improve productivity (about 250 pages per hour).
The first steam-powered printing press was designed in 1811 by the German architect Friedrich Koenig, with a capacity of about 1,100 printed pages per hour. Later, this printing press was sold to The Times, where it was improved to allow printing on both sides of the paper.
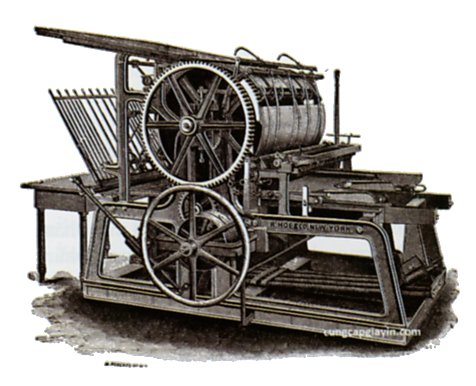
However, it was not until the invention of the Linotype machine in 1884 that the history of printing truly reached a memorable milestone. By using a typewriter keyboard, the Linotype machine allowed characters to be entered through mechanical operation instead of by hand as before. With a capacity of up to millions of copies per day, the Linotype machine made newspapers the main means of communication at that time (Figure 4).
1.4. The 20th Century: the era of electronic printing
Alongside conventional printing technology, developed in the 19th century and used only for large-volume orders, the mid-20th century marked the beginning of the development of electronic printing machines, from small to ultra-small sizes. Printers used in offices and homes produced high-quality prints in small quantities at an affordable cost. These include laser printers, dot matrix printers, inkjet printers, thermal printers, and photocopiers...
1.5. Did you know?
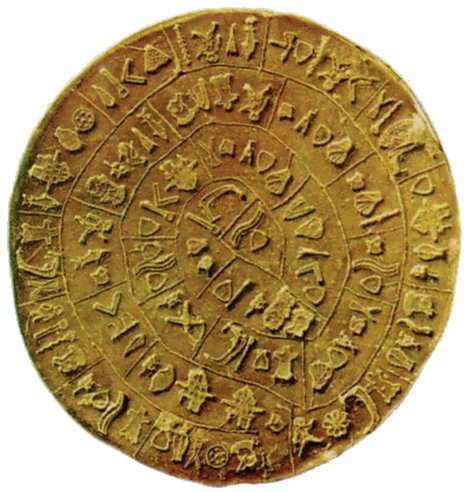
The oldest known printing tool is believed to be the Phaistos Disc (Figure 5), discovered on the island of Crete, Greece, and dating back to around 1800-1400 BC. Many scientists believe that this disc is one of the earliest printing tools created in human history.
The Diamond Sutra is the oldest surviving printed work, dating back to around 868 AD. It was found in the Dunhuang caves, located along the historic Silk Road, in 1907.
The record for the fastest printing speed is held by the IBM Infoprint 4100, which can print 330 pages per minute. It is also the most expensive printer in the world, costing about 1 million USD each.
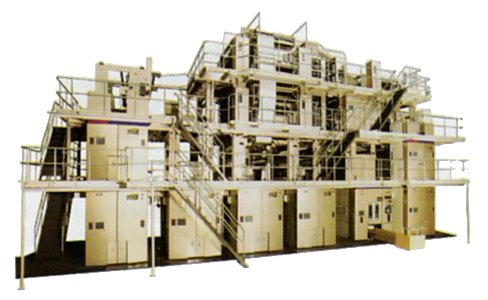
The largest printing machine in the world: This record is held by the Mitsubishi Diamondstar printing machine (Figure 6), which is about the size of a 4-story building. One printing machine costs about 50 million Japanese yen, equivalent to more than 400,000 USD.
1.6. The founder of printing in Vietnam
Lương Nhữ Hộc (1420-1501), courtesy name Tường Phủ and literary name Hồng Châu, was a renowned scholar and official of the Later Lê dynasty.
During his two missions as a diplomatic representative to China, he learned the craft of woodblock printing there. After returning home, he passed on this craft to the people of Liễu Tràng and Hồng Lục villages, causing the printing craft in the area to flourish. For this reason, he is considered the founder of the printing craft in Vietnam.
Although printing had existed earlier, it was only used within Buddhist circles and for state administration. Through his teachings, Liễu Tràng and Hồng Lục villages became the national center for printing block carving and, eventually, traditional block print art. Many books were printed here, including the monumental Đại Việt sử ký toàn thư [大越史記全書] (Complete Annals of Đại Việt), which was fully carved for the first time by craftsmen from Hồng Lục and Liễu Tràng villages in the 18th year of the Chính Hòa era (1697).
To commemorate his contributions, the people of Liễu Tràng village built a temple in his honor, appointed him as the village guardian deity, and regarded him as the founder of their craft. Today, Liễu Tràng village still preserves a memorial temple dedicated to Lương Nhữ Hộc, which was recognized as a historical site in 1992. An annual festival is held there from the 13th to the 15th day of the ninth lunar month.
2. Overview of printing techniques
There are three printing types:
- Relief printing (letterpress and flexography): the printing elements are raised above the non-printing elements.
- Planographic printing (offset, screen printing, mimeography, and lithography): the printing elements and non-printing elements lie on virtually the same plane.
- Intaglio printing (gravure): the printing elements are recessed below the non-printing elements.
2.1. Letterpress printing
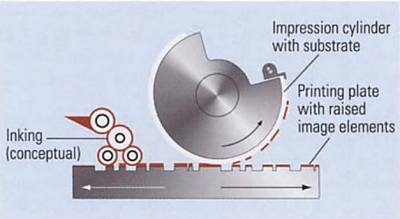
This was the first and oldest printing method. It was invented by the Chinese, but it was Johannes Gutenberg, the German pioneer of printing, who developed it further. Letterpress printing is based on the relief printing principle. On a letterpress printing form, the images, text, and other printing elements are raised above the non-printing areas. Ink is applied to the surface of the printing form, so that only the raised elements receive the ink. When pressure is applied during printing, the ink is transferred from the raised elements onto the paper, producing the desired image or text (Figure 7).
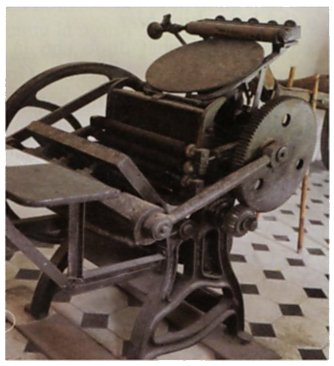
Movable-type letterpress printing is no longer used today because of its low productivity, outdated technology, and health hazards. The type was cast from lead alloy, and lead is a toxic metal. It has therefore been replaced by more modern printing methods. Some other applications of letterpress printing, such as numbering, embossing and debossing, and gold or silver foil stamping, are still in use today. In Vietnam, letterpress machines were adapted into hand-operated presses, which proved highly effective in practice (Figure 8).
2.2. Flexographic printing
Flexographic printing is the newest among the major printing technologies that use printing forms, including letterpress, offset, gravure, and screen printing. However, it has demonstrated significant advantages by producing a wide range of products, from simple to high-quality prints, on various substrates.
Flexographic printing forms are also a type of relief printing form, like those used in letterpress printing. However, they are made from flexible materials (rubber or photopolymer resin) through a photochemical exposure process. The image on the printing form is mirror-reversed, and ink is supplied through an anilox roller. The anilox roller is a metal roller whose surface is engraved with micro-cells. During printing, the roller is partially immersed in an ink tray. Ink fills the tiny cells on the roller surface, and the excess ink is removed by a doctor blade. The printing form then contacts the roller and receives ink from the cells on its surface. This technique is widely used for printing labels, packaging, and cardboard boxes. It can also be used on many special materials, such as fabric, cardboard, or polymer films (Figure 9).
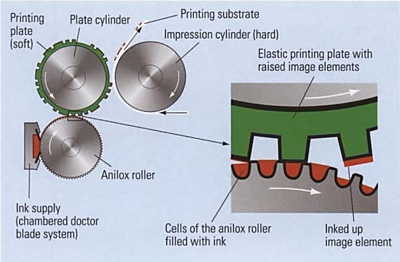
Flexographic printing is used for high-volume production requiring solid, uniform colors with minimal color variation and no complex images. If images are included, they must be converted to monochrome. This ensures complete color consistency and high-quality results, even when prints are produced several years apart.
2.3. Rotogravure printing
It is an intaglio printing method, where the images or text are engraved below the surface of a metal plate. In gravure printing, ink is first applied to the engraved cylinder surface, filling the recessed cells of the printing elements. A doctor blade then removes the excess ink from the non-image areas. Under printing pressure, the ink held in the recessed cells is transferred to the substrate, while the non-recessed areas do not carry ink and therefore do not print.
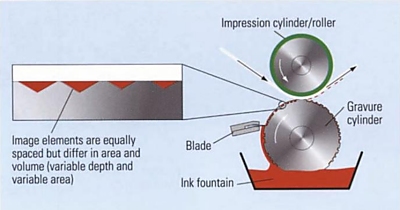
Gravure printing is used for printing plastic film packaging, such as packaging for detergent powder, confectionery, or instant coffee...
2.4. Screen Printing
Screen printing is one of the basic printing techniques. "Silk printing" is the common name given by craftsmen, derived from the fact that the mesh of the printing screen was originally made from silk. Later, when silk mesh was replaced by other materials such as cotton, synthetic fibers, and metal mesh for making printing screens, the technique came to be known as "screen printing". Screen printing operates on a principle similar to stencil printing: ink is forced through only the open areas of the mesh onto the substrate, while the remaining mesh openings are blocked by a photosensitive chemical coating. This printing technique can be applied to many materials, such as nylon, fabric, glass, watch faces, electronic circuits, certain metal products, wood, and paper. It can also be used as a substitute for underglaze painting in ceramic tile production. In the past, screen printing was mostly done manually. Today, there are also semi-automatic and fully automatic screen printing machines.
2.5. Mimeograph printing
This method has its own merits. The content to be printed is perforated onto a stencil in traditional Roneo rotary duplicators, or onto a master sheet in modern high-speed duplicators, using mechanical or thermo-photographic methods to create the printing master. The printing process is carried out by pressing ink through the stencil (in Roneo machines) or by spraying ink onto the master (in high-speed duplicators), allowing it to pass through the perforated areas and transfer onto the paper.
Its main advantages are simple master preparation, minimal toxicity (almost non-toxic), flexibility in print quantities (similar to screen printing), and very high printing speeds (up to 7,800 sheets per hour).
2.6. Lithography
Also known as litho or stone printing, it is a printing method that uses a smooth surface. The principle of lithography is based on the repulsion between oil and water (oil and water do not mix and always tend to separate from each other).
The reversed image from the oily design on the printing plate is applied to a Litho stone surface[1]. After that, this surface is dipped into water and lifted up. The water quickly flows to the areas on the surface that are not covered with oil, due to the repulsion between water and oil. Next, an oil-based ink roller passes over the surface. Oil-based ink dissolves in oil but does not mix with water. Thus, the areas covered with oil will receive ink, while the areas covered with water will not. The ink image on the surface will match the original oil design. This ink can be applied directly, or transferred through an intermediate surface, onto the paper or other surfaces.
2.7. Offset printing
Offset printing is an indirect printing technology that transfers ink through an intermediate surface. Ink is applied to the printing plate, transferred to the rubber blanket (offset blanket), and then transferred from the blanket onto the paper.
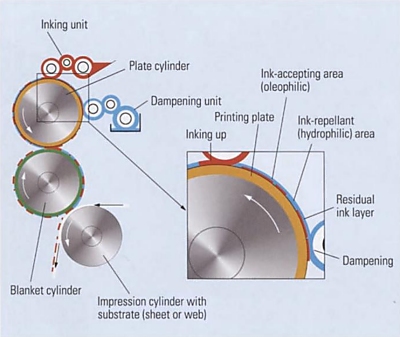
3. Color reproduction
3.1. Basic color model
The basic color model used by most printing machines today is CMYK, which consists of four colors: C (cyan), M (magenta), Y (yellow), and K (black). These four basic colors are used to produce a full-color print.
3.2. Color mixing theory
The basic colors mentioned above can be mixed together to reproduce all the colors found in nature. The basic principles of color mixing can be summarized as follows:
When yellow (Y) is mixed with cyan (C), it produces green.
When yellow (Y) is mixed with magenta (M), it produces red.
When magenta (M) is mixed with cyan (C), it produces blue.
By increasing or decreasing the proportions of the basic colors, different shades can be produced.
When a darker color is desired, black is added. For example, to create a dark red color (Bordeaux red), a proportion of K (black) from 30–40% is added. If 100% K is added to any color, it will become black.
When lighter colors are needed, artists add white. That is how artists mix colors for painting, and it is also how our eyes perceive colors. However, when colors are used for printing, white is actually the background paper itself.
The nature of each color we see is the result of mixing the four basic colors in certain proportions.
3.3. Resolution
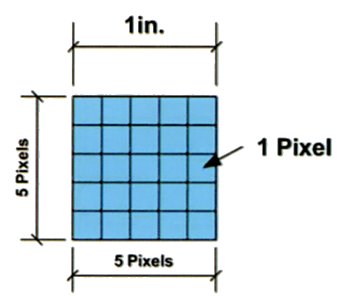
Pixels: In digital technology, an image is stored by dividing it into many tiny points arranged in a grid. As shown in Figure 12, the blue image is divided horizontally and vertically into 5 x 5 = 25 pixels. The image is then stored, with the color of each pixel being determined according to CMYK (x% C, y% M, z% Y, w% K). Therefore, digital images can be copied without any loss of quality.
The basic definition of resolution is the number of pixels displayed in a certain unit of area. Depending on the type of device or product, resolution can be described in two ways as follows:
For printers, the unit used is dpi, which is defined as the number of dots per inch. Thus, when we say that a printer has a resolution of 600 dpi, it means that it can place 600 dots per inch. The higher the printer resolution, the smoother the printed image will be. The common printer resolutions today are 600 dpi and 1,200 dpi.
For computer monitors, tablets, smartphones, and other devices, since they are not square, resolution is defined as the exact number of pixels along each dimension of the screen. Example: Full HD resolution is 1,920 x 1,080, meaning that one dimension of the screen has 1,920 pixels and the other dimension has 1,080 pixels. Thus, a Full HD screen can display more than 2 million pixels.
3.4. Color mixing in printers
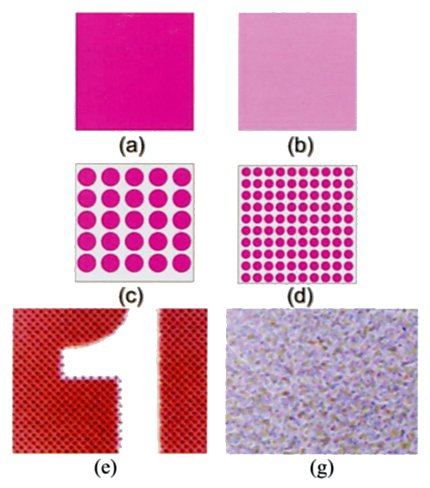
For printers, mixing colors before printing them like artists do is impossible. Printers can only print the four basic colors as solid colors. However, the printing density of each color is actually the color mixing ratio, in which the white of the paper serves as the white color.
Example: when we print normal magenta (100% M) and light magenta (50% M). Here, we need to understand that 50% M means that the remaining 50% is white.
Figure 13a shows 100% M, meaning that all of the M color is displayed and the white of the paper is not visible.
Figure 13b shows 50% M, meaning that the M color is only displayed at 50%, while the white of the paper occupies the remaining 50%.
Figure 13c shows Figure 13b printed at 600 dpi and magnified 400 times using a digital microscope.
Figure 13d shows Figure 13b printed at 1,200 dpi resolution and magnified 400 times using a digital microscope.
From the above example, it can be understood that the area of white (the paper) is exactly half the area of all the magenta dots combined. If the image is not magnified 400 times, our eyes will only perceive it as light magenta. Similarly, if an artist takes half magenta and half white, mixes them together thoroughly, and applies the mixture onto paper, it will also produce the same light magenta color as that produced by the printer. The only and extremely important difference is that when the artist's applied color area is magnified 400 or 1,000 times, it will still look like Figure 13b, and no individual color dots will be visible. Only when magnified 100,000 times would it be possible to see the magenta and white particles interspersed with each other. However, such observation is beyond the capability of ordinary users and can only be performed in specialized laboratories.
Finally, to print different colors, the printer must print 2 to 4 colors on the paper one after another, overlapping them to produce the colors according to the design. Figure 13e, when viewed normally, appears dark red, with black dots interspersed among the red. And Figure 13g is a color produced by mixing the four basic colors.
3.5. Advanced colors
Today, some offset printing machines can print 8 colors in a single pass. In addition to the 4 basic colors mentioned above, they can also print white (for text or as a background when printing on dark papers such as art paper or recycled paper), gold metallic ink, silver metallic ink, and apply a UV coating to improve color durability for outdoor use.
To produce subtle light and very light colors, modern color inkjet printers use 6 or 8 colors. In addition to the 4 basic CMYK colors, manufacturers also add 2 or 4 lighter colors (which are essentially color inks mixed with white ink). When the two additional colors are added, they are LC (light cyan) and LM (light magenta). When four additional colors are added, LY (light yellow) and LK (light black, also known as gray) are included as well.
3.6. Halftone techniques
When printing technology was first invented and the first books were printed, printing photographic images was an extremely difficult problem. The reason is that photographs have tonal gradations, meaning they contain dark areas, light areas, and intermediate areas, with some parts being darker and others lighter. To print these images, it is necessary to print layers of ink with different thicknesses and intensities onto the printing material, in order to reproduce the variations in density similar to those in the original image. However, printing methods only allow a layer of ink with the same thickness to be printed onto the material.
To address this problem, a solution was developed: instead of printing ink layers with different thicknesses to reproduce the image, the image is printed using small dots (called halftone dots). These dots vary in size according to the shades of the original image. Because these dots (particles) are very small, and due to the interaction between the ink color of the dots and the white paper background, our eyes perceive the density of the printed image as changing correspondingly to that of the original image (Figure 13d).
3.7. Color misalignment
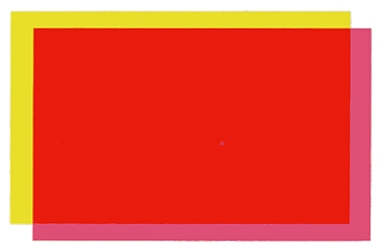
As shown in Figure 14, if the printing is correct, the two rectangles in M (magenta) and Y (yellow) should overlap exactly and create the color red. However, during the printing process, for some reason the M color printing plate becomes misaligned with the Y color printing plate. As a result, when looking at the image, we can see a yellow border on one side and a magenta border on the other side. This printing error is commonly encountered in offset printing.
4. Identifying printing techniques using a digital microscope (800x)
4.1. Flexography and gravure printing
Flexographic printing is based on the use of pre-mixed inks, much like an artist mixes colors before painting. Consequently, color variations are typically reproduced by overprinting no more than two ink colors. The more colors a print requires, the more color stations the press must have. Today, flexographic presses with up to 10 color stations are available.
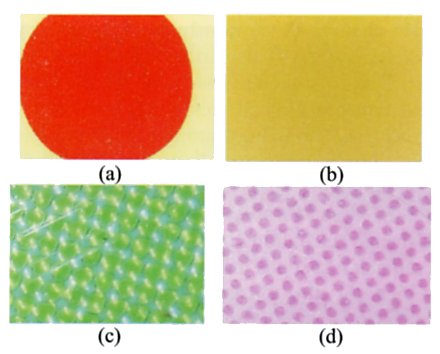
In return, the print quality is excellent. This printing process has two characteristic cases: If a solid color is printed, the color is uniform and completely covers the printed area. If a gradient is printed, the halftone dots are very round and highly uniform, but noticeably larger than those produced by offset printing (Figure 15). For example, Figures 15a and 15b show prints in solid primary colors, Figure 15c shows halftone dots printed with three different colors, and Figure 15d shows halftone dots printed with two different colors.
4.2. Letterpress printing
The principle of letterpress printing is to press from a hand-crafted printing form or plate; therefore, it almost never uses two-color overlapping halftones. This printing method uses a rigid printing form; therefore, when the paper is pressed onto the form, an impression of the printing form remains on the paper. Because it also uses pre-mixed inks, magnification reveals results similar to the basic non-halftone colors of flexographic printing (Figures 15a and 15b).
4.3. Inkjet printing
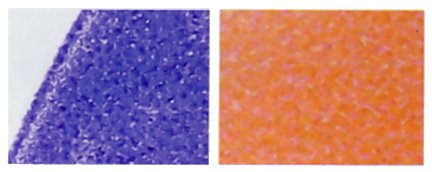
Inkjet printers spray liquid ink droplets onto the paper, where they dry naturally. As a result, color mixing occurs on the print surface. It can be identified by the absence of clearly defined color dots; all areas appear slightly blurred and uneven, even in solid colors. Lithographic printing also shows a similar appearance to this method (Figure 16).
4.4. Offset printing
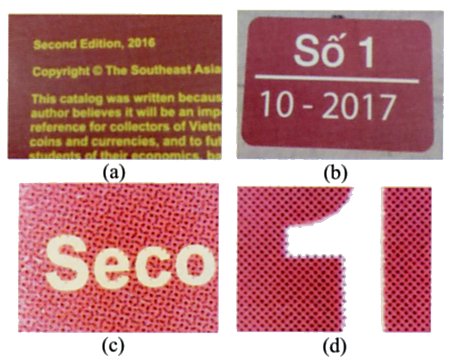
Although its color quality is slightly lower than that of flexographic printing because multiple inks are overprinted to create the desired colors, when printing solid basic colors, the results are quite good: the color areas are even, and the ink appears to slightly stand out from the paper. For mixed colors, however, the halftone dots are not as round and uniform as those in flexographic printing, but they are smaller. Nevertheless, the image still looks very good to the naked eye. Screen printing also produces similar results, with larger halftone dots (Figure 17).
Figure 17c is an enlargement of Figure 17a, and Figure 17d is an enlargement of Figure 17b. Figure 17b is darker red than Figure 17a, so the amount of black halftone dots in Figure 17d is also greater than in Figure 17c.
4.5. Laser printing
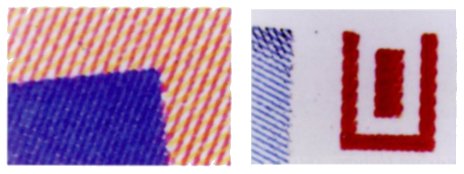
Similar to offset printing for solid and basic colors, but for mixed colors, the machine does not use halftone dots; instead, it uses parallel color stripes (Figure 18).
4.6. Dot-matrix, mimeograph, and thermal printing
Because these printing methods are of lower quality and have limited relevance to this article, the author will not discuss them in depth here.
5. Printing money
Regardless of the circumstances, currency is always printed under the best conditions available. Due to the high security requirements, even though ordinary printing machines could be used for currency printing, specialized printing techniques are applied to produce banknotes that are visually appealing and more difficult to counterfeit. Nowadays, with the aid of modern equipment, we can easily identify these techniques. In this section, the author provides only a brief overview of the printing techniques used for the banknotes of the Democratic Republic of Vietnam (as they have no particularly distinctive features), while giving a more detailed treatment of the printing techniques used for the banknotes of the Socialist Republic of Vietnam.
5.1. Basic principles
These are two unwritten principles that are always followed by currency printers in order to produce banknotes with characteristics completely different from ordinary printed materials, even when using the same type of printing machine.
The first principle: Never overprint colors to create other colors from the four basic colors, as in offset printing (even when an offset printing machine is used for printing currency). Only use solid colors for printing. In other words, color misalignment is not acceptable.
The second principle: There must always be special security features (codes) that enable experts to easily distinguish between genuine and counterfeit banknotes. During the early period from 1940 to 1978, these special features were usually incorporated into the printing plates[2] and were more focused on security aspects. Therefore, the author will discuss this topic in greater detail in a future article. From the 1980s onward, these special features have been created purely through printing techniques, so the author will present them in detail in another article.
5.2. Banknotes printed in Northern Vietnam
Artist Lê Phả wrote: "Furthermore, one must understand the printing techniques of several types of printing machines: offset printing is different from letterpress printing, so that the artwork can be created appropriately for the printing technique. A beautiful design that cannot be printed is ultimately useless."[3]
Thus, the entire early series of banknotes printed in Northern Vietnam used only two printing methods: letterpress printing and offset printing. Of course, it still followed the principle of using pre-mixed inks and avoiding color overprinting. Most of the specimens examined by the author clearly display the characteristics of offset printing on medium-quality paper, with large patches of missing color appearing in recessed areas of the paper surface (indicated by the arrow in Figure 19). After over 60 years, finding specimens to differentiate between notes produced via offset versus letterpress presents a challenge. Over the years, the impressions left by letterpress printing on the paper have likely faded with time, although it is still possible to identify them. But this would require considerably more effort and more advanced equipment, while the distinction has little significance for collectors because variations among printed banknotes were inevitable at that time.
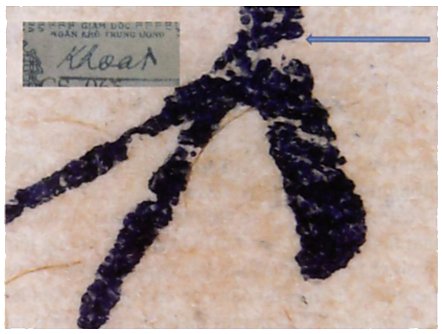
However, there is one banknote that was certainly printed using the letterpress method: the 1 đồng "Sunrize" note (P-15). The lines depicting the farmers are unclear and merge together. This was caused by "The zinc printing plate for the banknote image being used in overly rushed printing, causing the drawn lines to spread and one line to merge with another. Everyone knew it!"[4] By comparing the principle of letterpress printing described in Section 2.1 (Figure 7) with the principle of offset printing in Section 2.7 (Figure 11), we can clearly see that only a raised, rigid printing plate (letterpress) can spread or deform while still remaining usable for printing. In offset printing, the printing plate is merely a thin metal plate, so once it deforms, it must be discarded immediately.
5.3. Bankotes Printed in Southern districts
In 1949, to ensure secrecy, the Southern Special Printing Bureau was ordered to relocate to the U Minh military zone. Printing banknotes in the military zone at that time was extremely difficult, yet the staff and workers of the Southern Special Printing Bureau worked with extraordinary dedication and successfully fulfilled the tasks entrusted to them. There, the 1 đồng, 5 đồng, and 20 đồng banknotes were printed in large quantities on ordinary writing paper using a foot-operated letterpress printing machine.[5]
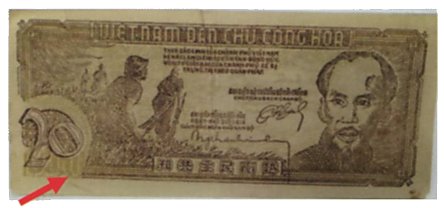
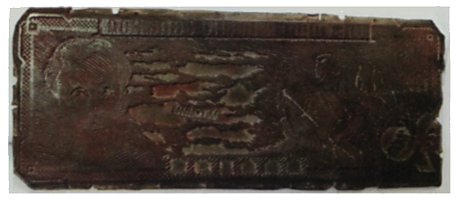
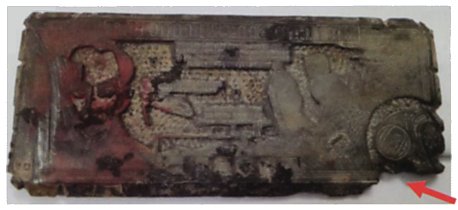
Thus, from 1949 onward, the 1 đồng, 5 đồng, and 20 đồng banknotes (Figure 21) were printed using the letterpress method. This is also consistent with the surviving artifacts known to collectors: dedicated banknote printing plates for letterpress presses, approximately 2 mm thick and quite heavy (Figures 22 and 23). In Figure 21, the area indicated by the arrow contains no brown ink, showing only the yellow background; correspondingly, on the reverse-engraved zinc plate used for the brown layer (Figure 23), the non-raised areas corresponding to the brown image were cut away.
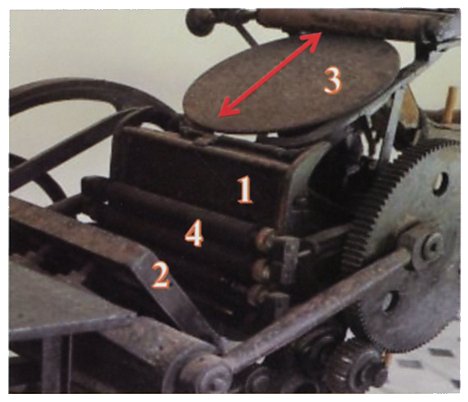
Referring to Figure 26, we can clearly see that the brown printed lines are overprinted on top of the yellow printed lines; therefore, the brown color was printed after the yellow color. The operating process of the letterpress printing machine shown in Figure 24 is as follows:
- Step 1: Printing the yellow color.
- Install the zinc plate shown in Figure 22 into position No. 1. If eight banknotes are printed in a single run, eight such plates are installed.
- Apply the printing ink (a liquid with relatively high viscosity) onto disc No. 3 and start the machine. The roller on disc No. 3 then moves back and forth within the range indicated by the red arrows, while the disc itself rotates around its axis to mix and distribute the ink evenly.
- Once the ink is evenly distributed, the machine is switched to supply ink to the three No. 4 rollers. At this point, the upper roller moves down to the three No. 4 rollers to apply ink onto them. At the same time, the three No. 4 rollers rotate and move up and down, applying ink to the zinc plate at position No. 1 behind them.
- Place the paper to be printed into tray No. 2 and withdraw your hand.
- Press the foot pedal[6]. The flywheel rotates, driving tray No. 2 quickly and firmly against tray No. 1, after which tray No. 2 returns to its original position. The operator removes the freshly printed sheet from the machine with the left hand and places the next sheet onto position No. 1 with the right hand, repeating the process continuously.
- Step 2: Printing the brown color. Clean the machine and repeat the above process using the brown ink.
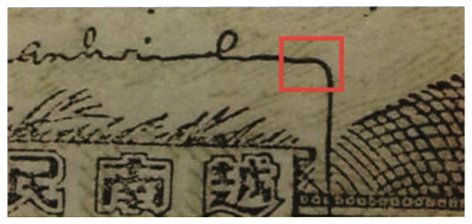
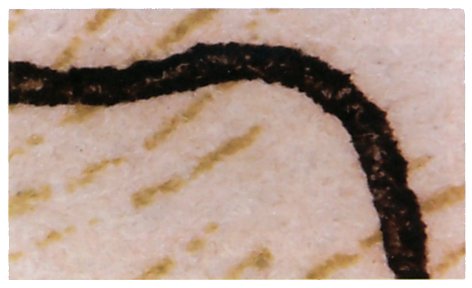
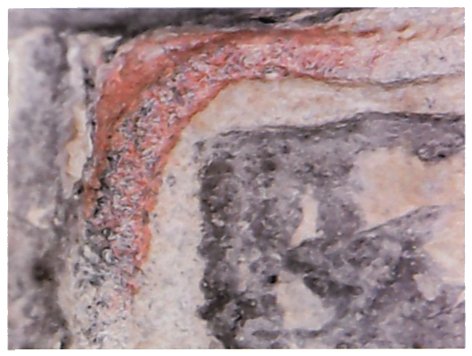
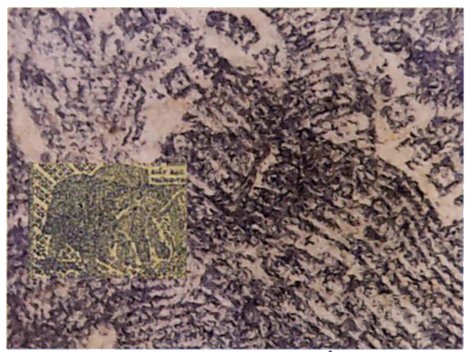
Furthermore, examination of the available specimens further confirms this point. Magnification of the Southern 20 đồng note (Figure 26) shows that the printed ink has a very uniform density, with very few gaps in ink coverage, and any such gaps are extremely small. This clearly demonstrates the characteristics of letterpress printing: when the paper is pressed firmly against the printing plate on a flat surface, it absorbs ink better than when ink is transferred from a rubber blanket (the offset plate) onto the paper. Magnification of the zinc printing plate (Figure 27) clearly shows that its surface is not perfectly flat, but still contains very small uneven areas. This also explains why, despite being pressed firmly against the plate, some parts of the printed lines still fail to receive ink.
[1] Litho stone: a very fine-grained, relatively soft stone with a yellowish-gray color. The stone used for printing must have an area larger than 0.5 m²
[2] It is like an office clerk who has just received the organization's official round seal, taking it outside and tapping it against the concrete floor to deform it slightly. A forged document bearing a perfectly round seal would be immediately recognized as fake. At the end of her term, she taps it a second time so that documents stamped during the different periods can be easily distinguished.
[3] Lê Phả, 1991. Con đường dẫn tôi đến vẽ giấy bạc ở Chiến khu Việt Bắc. 40 mùa sen nở. State Bank of Vietnam, Hanoi. pp. 145-146.
[4] Lê Phả, 1991. Con đường dẫn tôi đến vẽ giấy bạc ở Chiến khu Việt Bắc. 40 mùa sen nở. State Bank of Vietnam, Hanoi. p. 148.
[5] Huỳnh Hoài Hãn, 2017. Ban Ấn loát Nam Bộ. Vietnam Numismatics #1, p.33.
[6] When the press is turned on, the rollers spin continuously. Only when the foot pedal is pressed does tray No. 2 press the sheet against the printing plate in tray No. 1. This is why it is called a foot-operated letterpress press rather than a foot-powered press. The machine itself is electrically driven; the foot pedal merely activates the printing action.